
🏭 Maximo MCP Server
AI-Powered Development for IBM Maximo





Transform your Maximo development workflow with AI-driven schema discovery, live data querying, and intelligent code generation.
Author: Markus van Kempen
Email: mvankempen@ca.ibm.com | markus.van.kempen@gmail.com
Date: 5 February 2026
🎯 What is This?
The Maximo MCP Server is a Model Context Protocol server that connects AI assistants (like Antigravity, Cursor, or VS Code Copilot) directly to your IBM Maximo environment. Instead of manually copying API documentation, the AI can:
| Capability | Description |
|---|---|
| 🔍 Discover APIs | Find available Object Structures (MXWO, MXASSET, etc.) |
| 📋 Inspect Schemas | Get exact field names, types, and descriptions |
| 📊 Query Live Data | Execute OSLC REST queries and see real results |
| 🎨 Generate UI | Create Carbon Design System tables and dashboards |
| ✅ Validate Instantly | Test queries before generating final code |
📚 Documentation
Core Guides
| Document | Description |
|---|---|
| 📖 Maximo MCP Server Guide | Complete setup, configuration, and tool reference |
| 🔌 Maximo API Interaction Guide | OSLC query syntax, code generation patterns, troubleshooting |
| 🎬 Asset Manager Case Study | Step-by-step walkthrough of building a complete app |
French Translations
| Document | Description |
|---|---|
| 📖 Guide du Serveur MCP Maximo | Version française du guide complet |
| 🔌 Guide d'Interaction API Maximo | Version française du guide API |
Word Documents
All guides are also available in .docx format in the docs/ folder for offline reading and sharing.
⚡ Quick Start
Prerequisites
- Node.js v18 or higher
- Maximo API Key with read access
- AI IDE with MCP support (Antigravity, Cursor, VS Code + Continue)
Installation
Installation
Method 1: Run directly with npx (Recommended)
npx maximo-mcp-server
Method 2: Clone from Source
# Clone the repository
git clone https://github.com/markusvankempen/maximo-mcp-ai-integration-options.git
cd maximo-mcp-ai-integration-options

# Install dependencies
npm install

# Set up environment variables
cp .env.example .env
# Edit .env with your Maximo credentials
Environment Configuration
Edit the .env file with your Maximo credentials:
# .env (never commit this file!)
MAXIMO_URL=https://your-maximo-host.com/maximo/api
MAXIMO_HOST=https://your-maximo-host.com
MAXIMO_API_KEY=your-api-key-here
MAXIMO_OPENAPI_PATH=./maximo_openapi.json
PORT=3002
Download the OpenAPI Schema (Recommended)
The OpenAPI schema file enables offline schema lookups for faster AI responses:
# Download from your Maximo instance
curl -X GET "https://your-maximo-host.com/maximo/oslc/oas/api" \
     -H "apikey:your-api-key-here" \
     -o maximo_openapi.json
Alternatively, download via Swagger UI at: https://your-host/maximo/oslc/oas/api.html (Click "Explore" or "Download")
Method 3: Direct Browser Download (Manual)
If curl fails (e.g., due to SSL/network errors), you can manually download the file:
-
Open this URL in your browser:
https://[YOUR_MAXIMO_HOST]/maximo/oslc/oas/api(Replace[YOUR_MAXIMO_HOST]with your actual server address) -
You may be prompted to log in to Maximo.
-
Once the JSON loads, right-click the page and select "Save Page As...".
-
Save the file as
maximo_openapi.jsonin your project root folder.
Note: This file is ~12MB and contains all Object Structure definitions for your Maximo instance.
IDE Configuration
Google Antigravity (Manual Setup Required)
⚠️ Note: The Antigravity MCP Store is curated and does not auto-discover servers from the registry. You must add this server manually.
- Open Antigravity
- Click "..." dropdown at the top of the Agent panel
- Select "MCP Servers" → "Manage MCP Servers" → "View raw config"
- Add to your
mcp_config.json:
{
  "mcpServers": {
    "maximo-mcp-server": {
      "command": "npx",
      "args": ["-y", "maximo-mcp-server"],
      "env": {
        "MAXIMO_URL": "https://your-maximo-host/maximo/api",
        "MAXIMO_API_KEY": "your-api-key-here",
        "MAXIMO_HOST": "https://your-maximo-host"
      }
    }
  }
}
- Save and click Refresh
Cursor / Claude Desktop
# Copy the template
cp config/mcp_config.json.example ~/.cursor/mcp.json
# Or for Claude Desktop:
cp config/mcp_config.json.example ~/Library/Application\ Support/Claude/claude_desktop_config.json
Edit with your Maximo credentials:
{
  "mcpServers": {
    "maximo-mcp-server": {
      "command": "npx",
      "args": ["-y", "maximo-mcp-server"],
      "env": {
        "MAXIMO_URL": "https://your-maximo-host/maximo/api",
        "MAXIMO_API_KEY": "your-api-key-here"
      }
    }
  }
}
Verify Connection
In your AI IDE, ask:
"Is the Maximo MCP server connected?"
The AI will call get_instance_details and confirm connectivity.
🎬 Live Demo
Asset Manager Application
We built a complete Maximo Asset Manager web application using only natural language prompts and the MCP server.
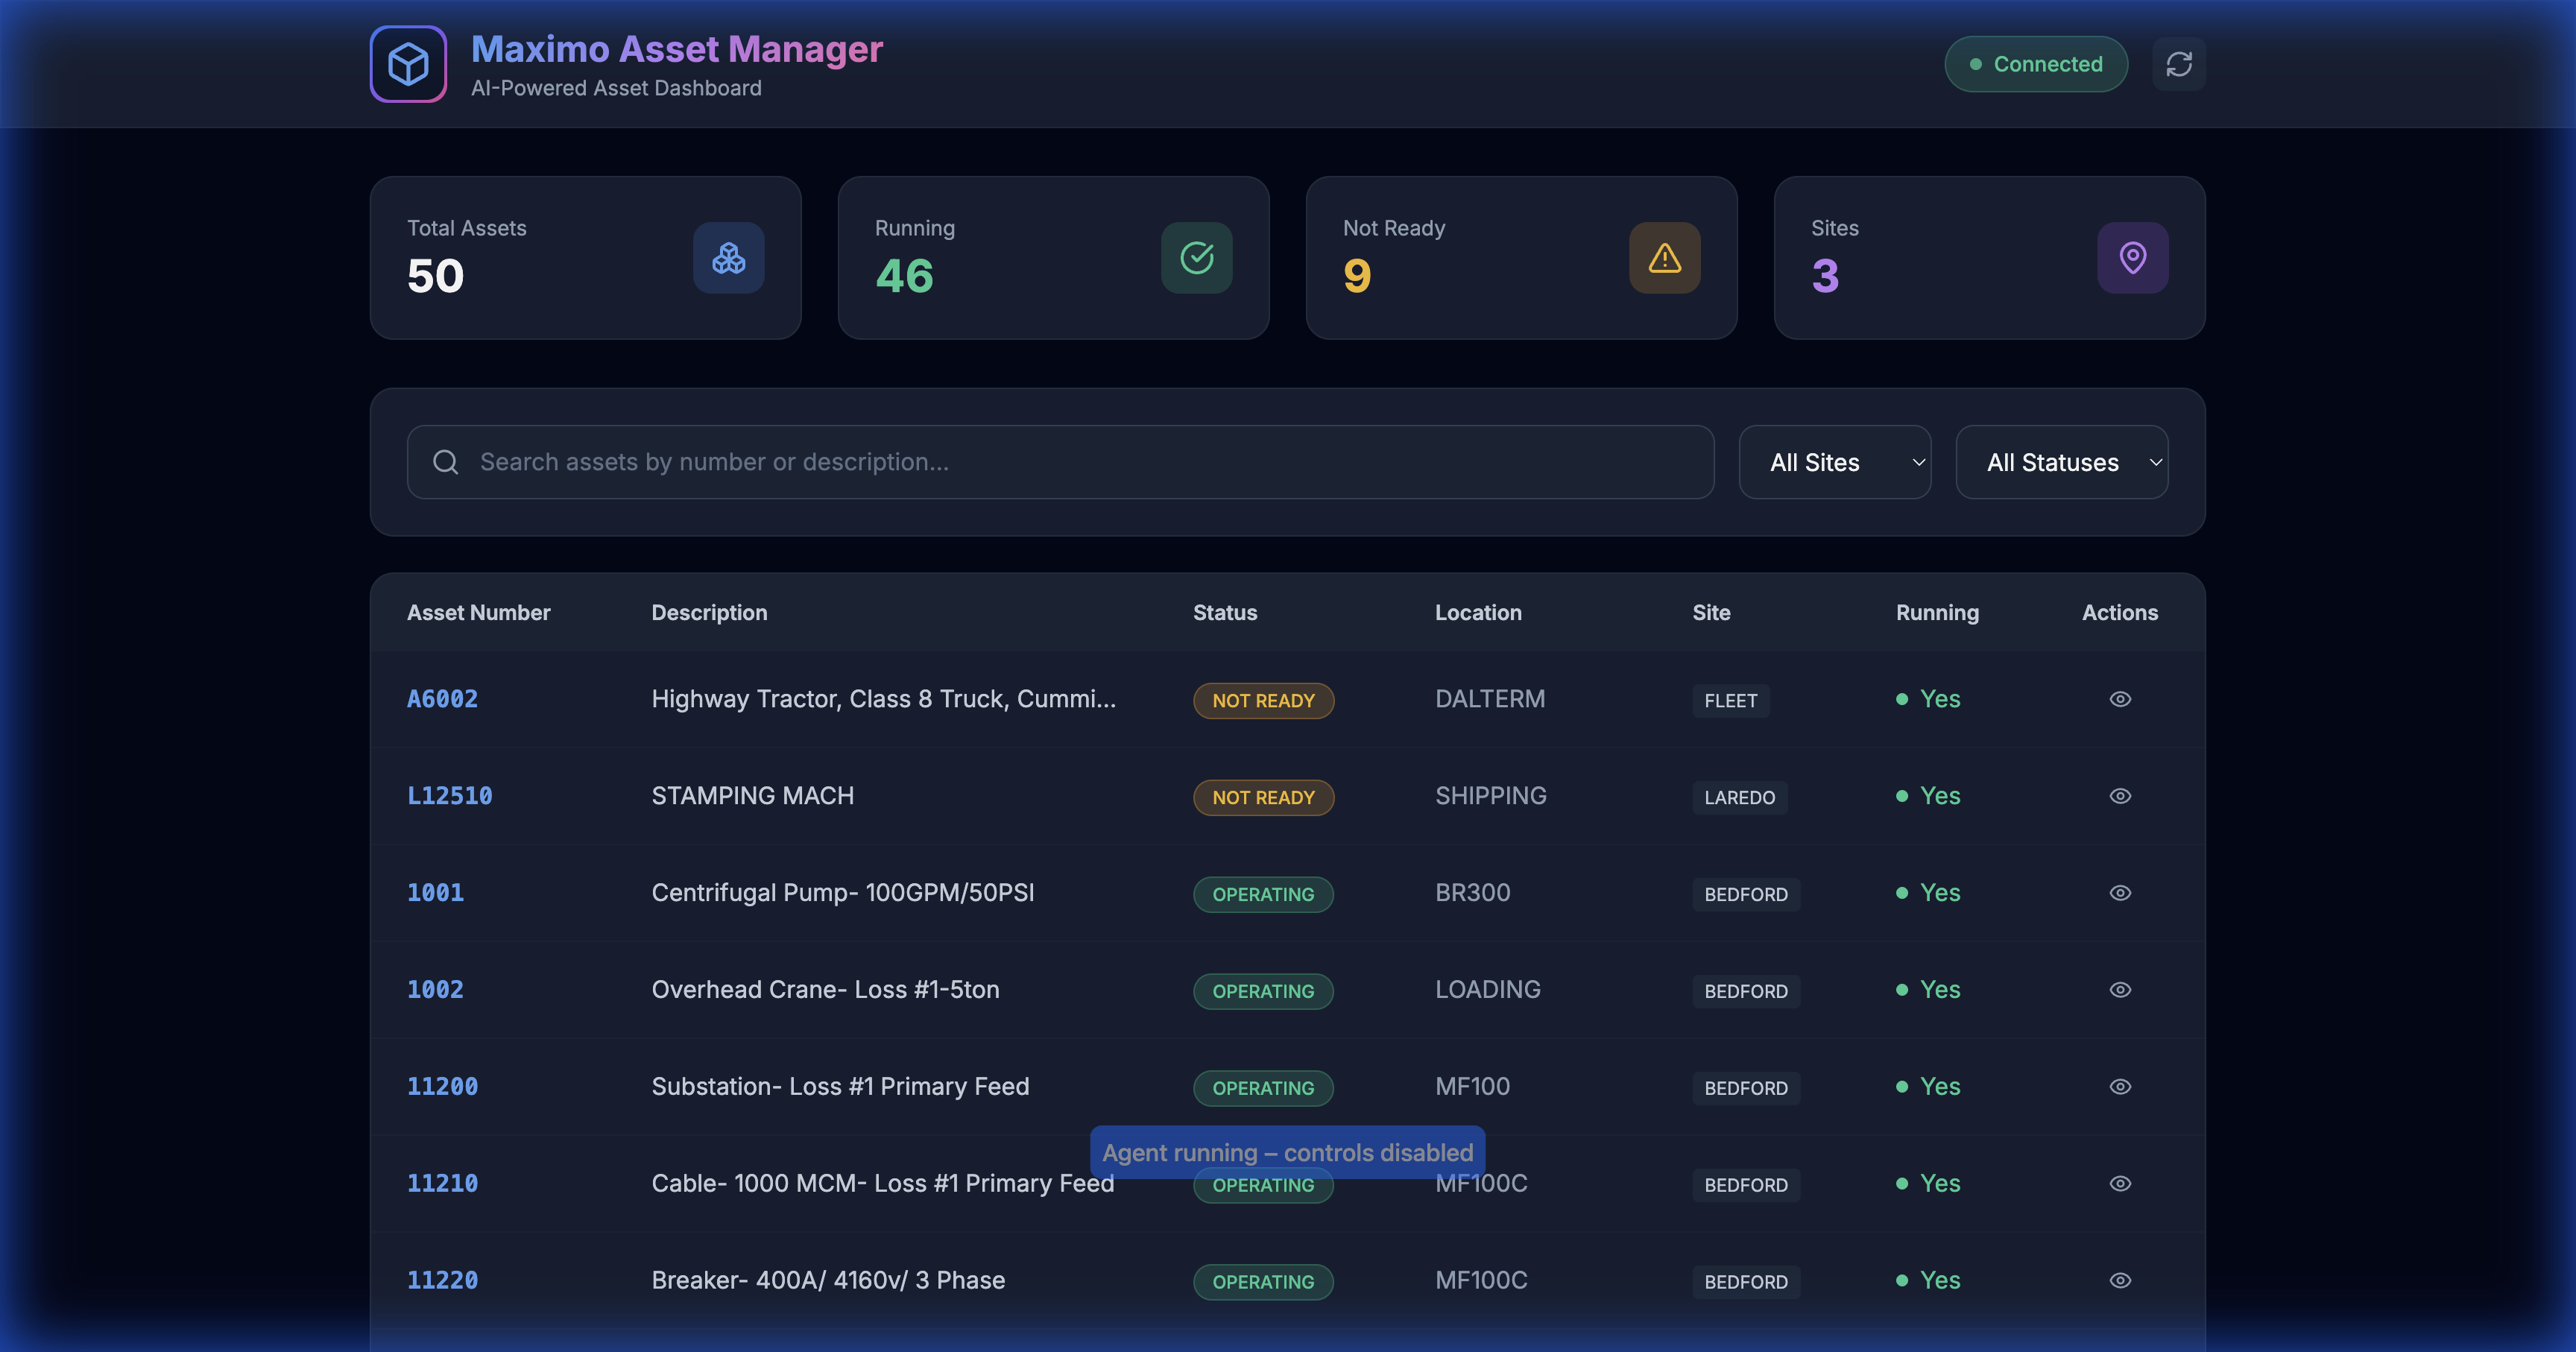
50 assets loaded with real-time filtering and search
Demo Features
| Feature | Screenshot |
|---|---|
| Full Dashboard | 50 assets, 4 stat cards, 3 sites |
| Search Filter | 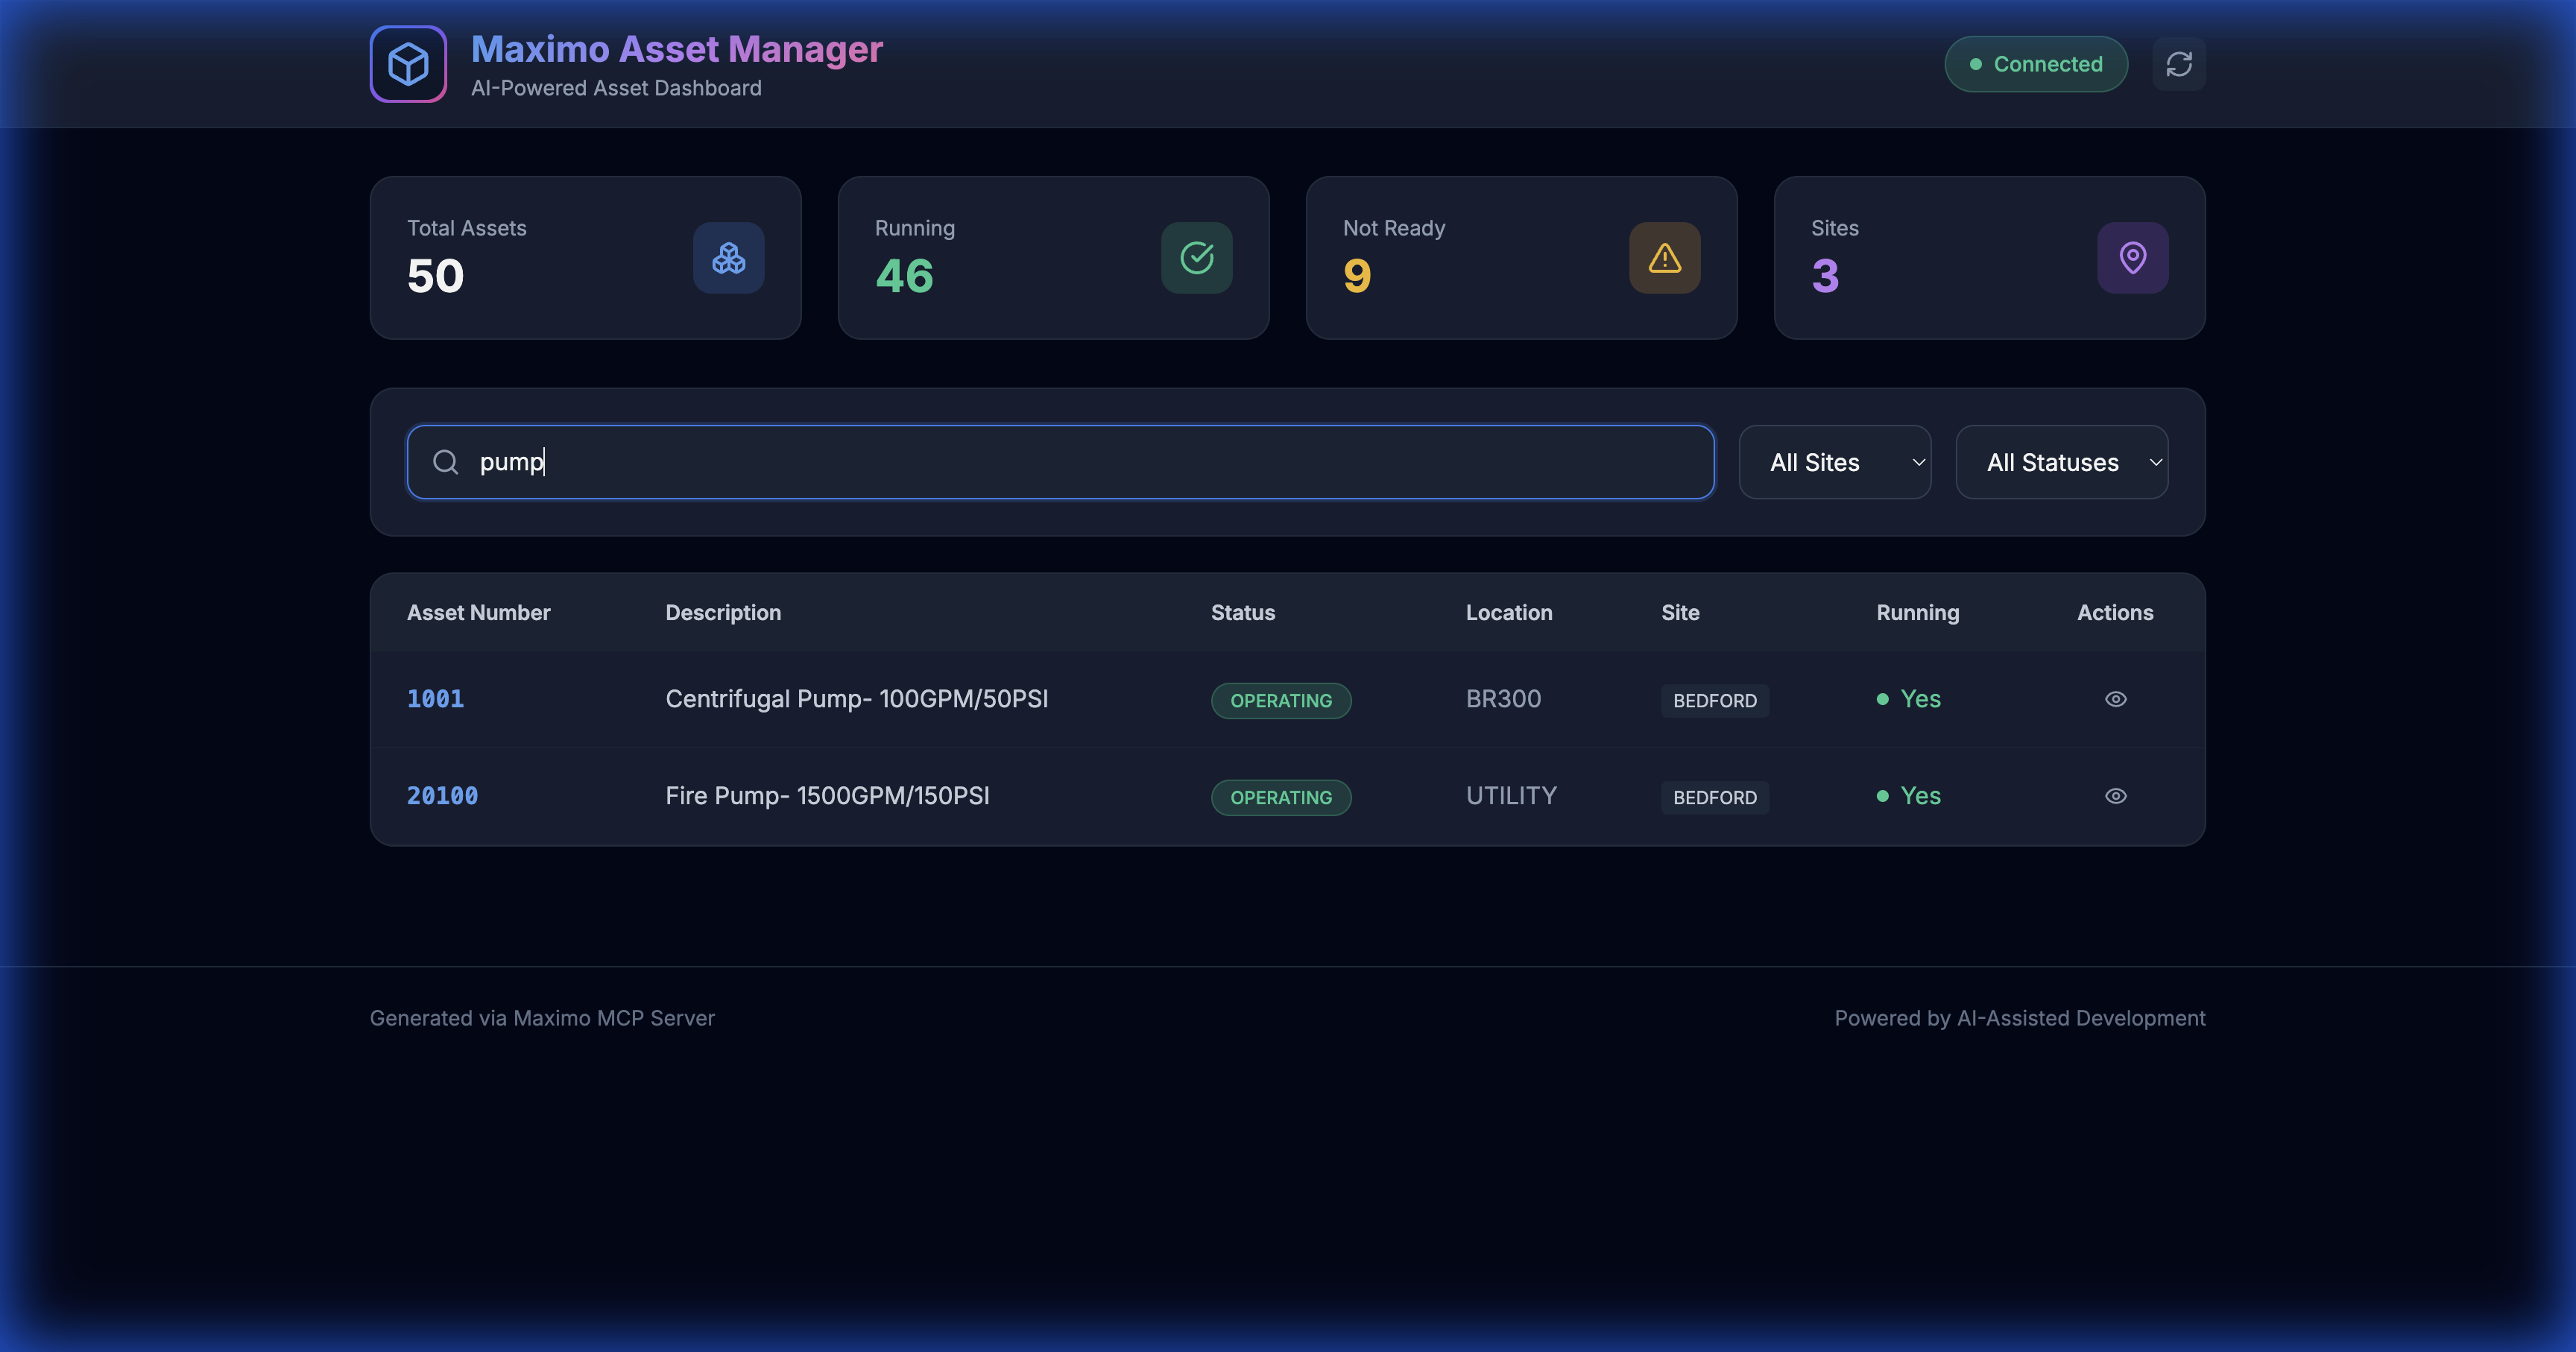 |
| Site Filter | 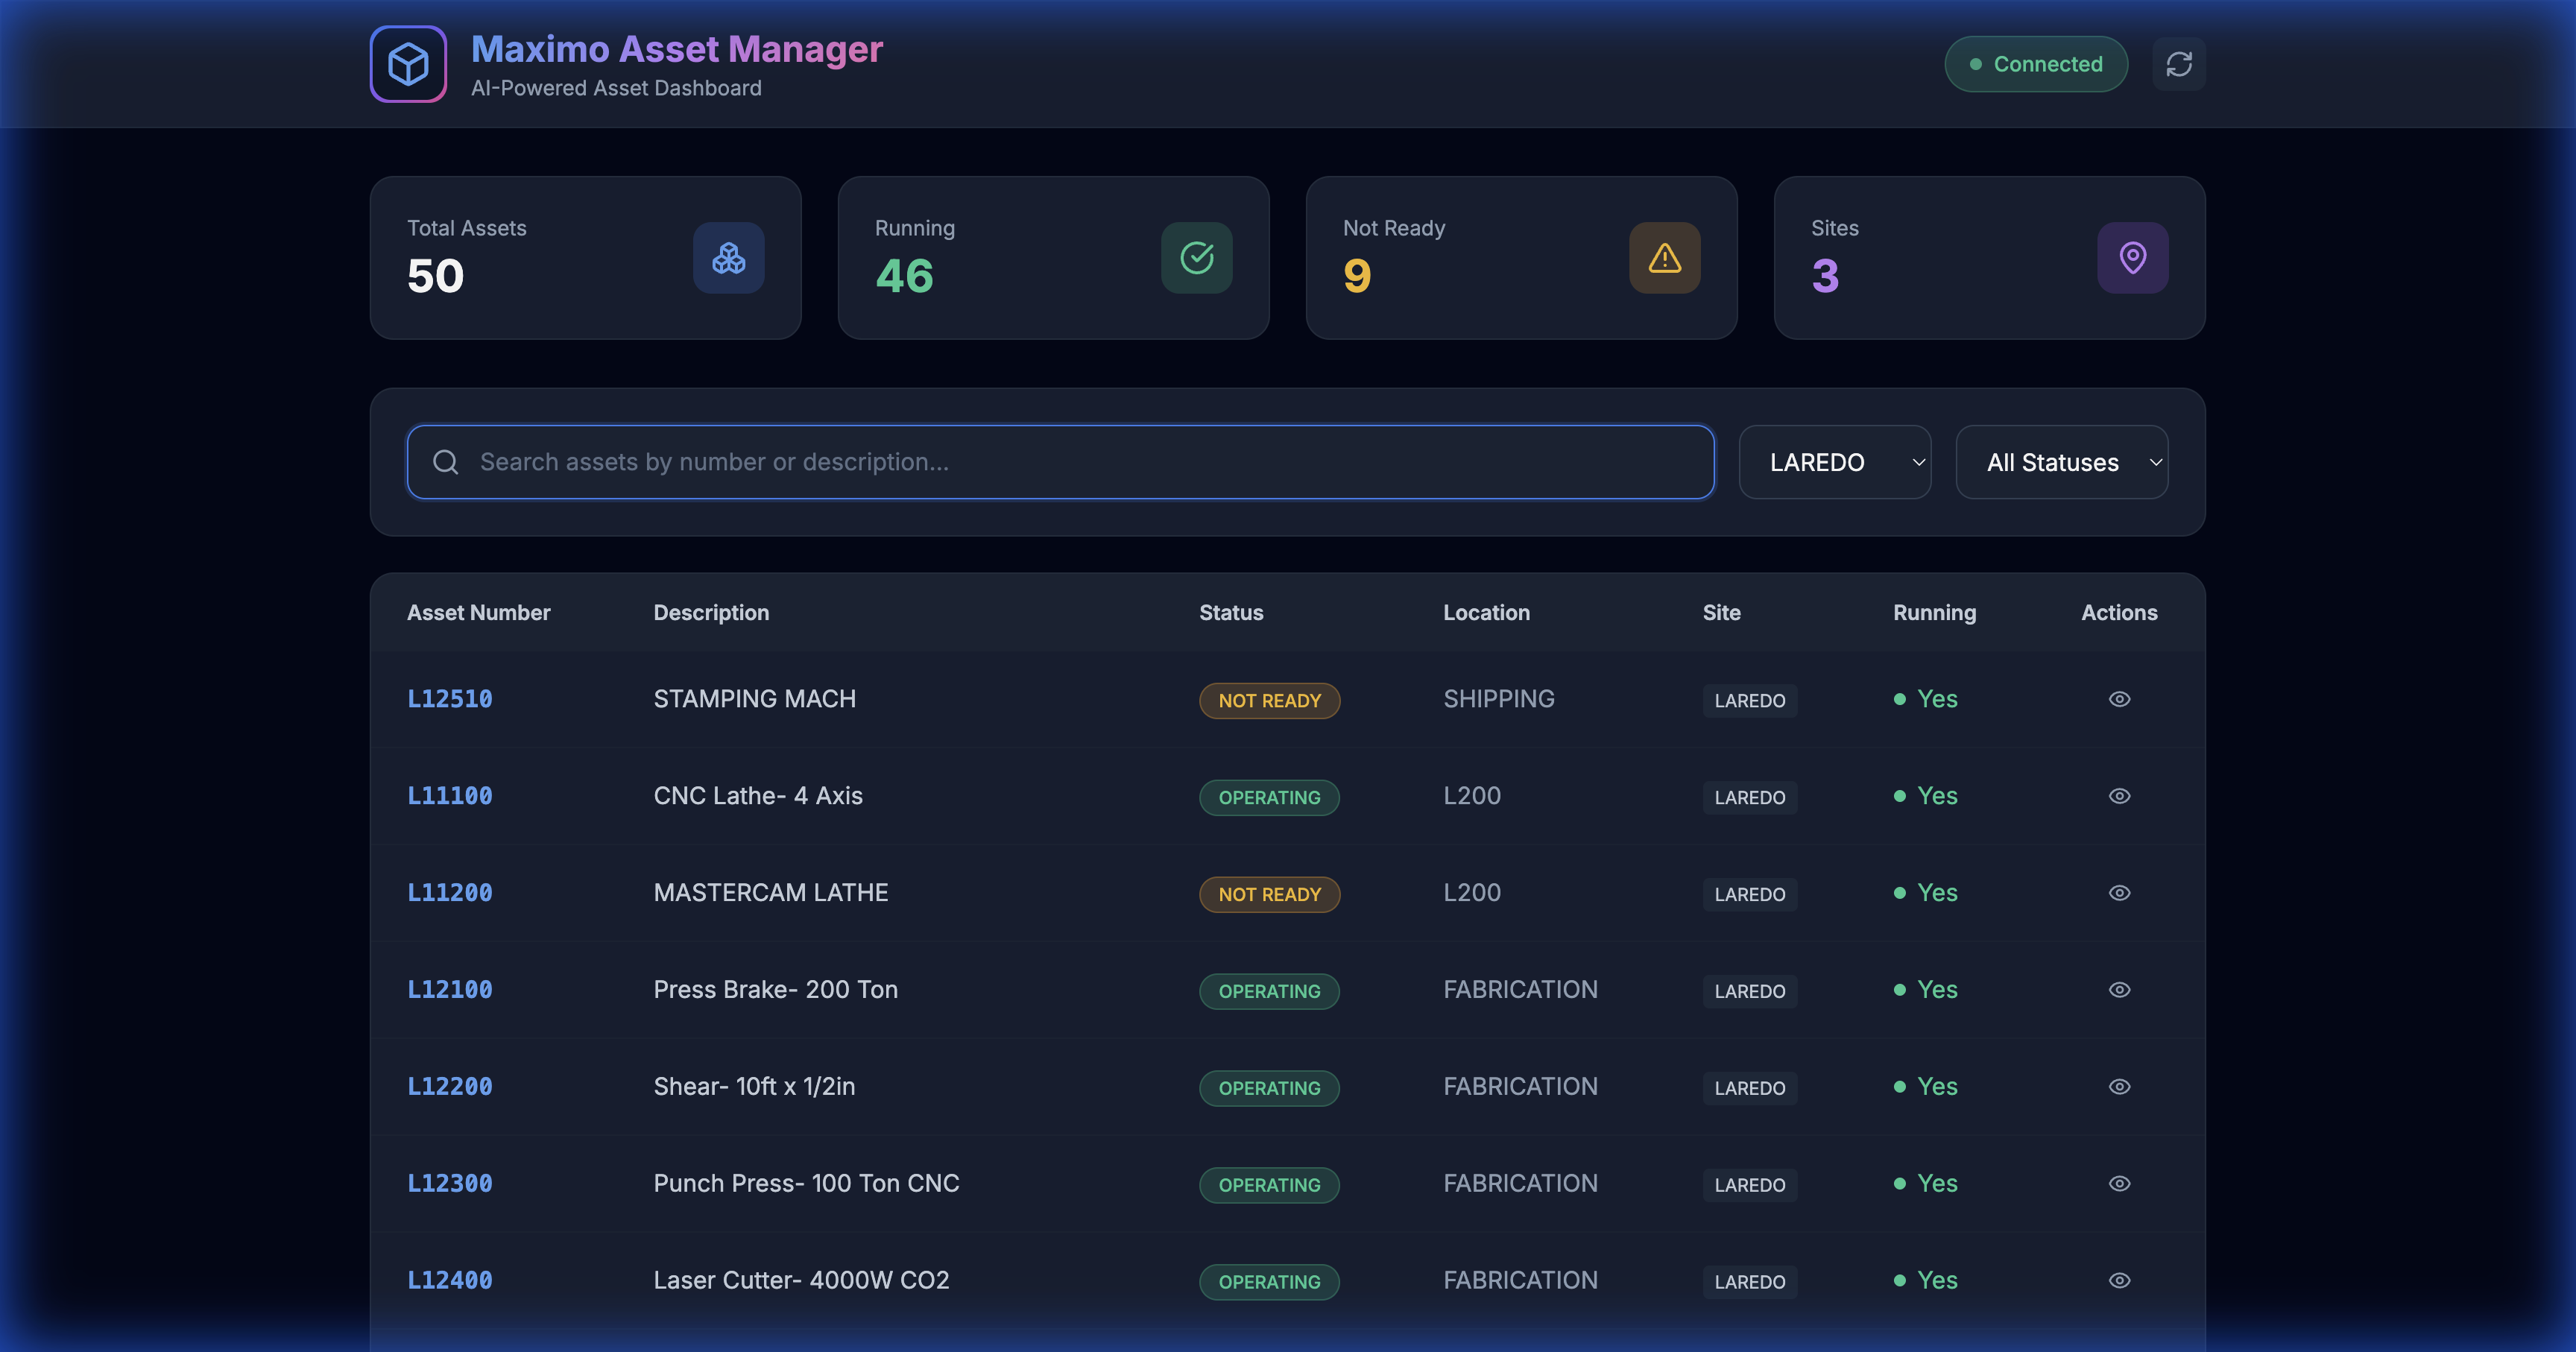 |
🎥 Screen Recording
A complete video demonstration is available: assets_demo_recording.webp
Try It Yourself
# Start the local proxy server
node server.js

# Open in browser
open http://localhost:3002/demos/assets.html
🛠 Available MCP Tools
The server exposes 6 tools to the AI:
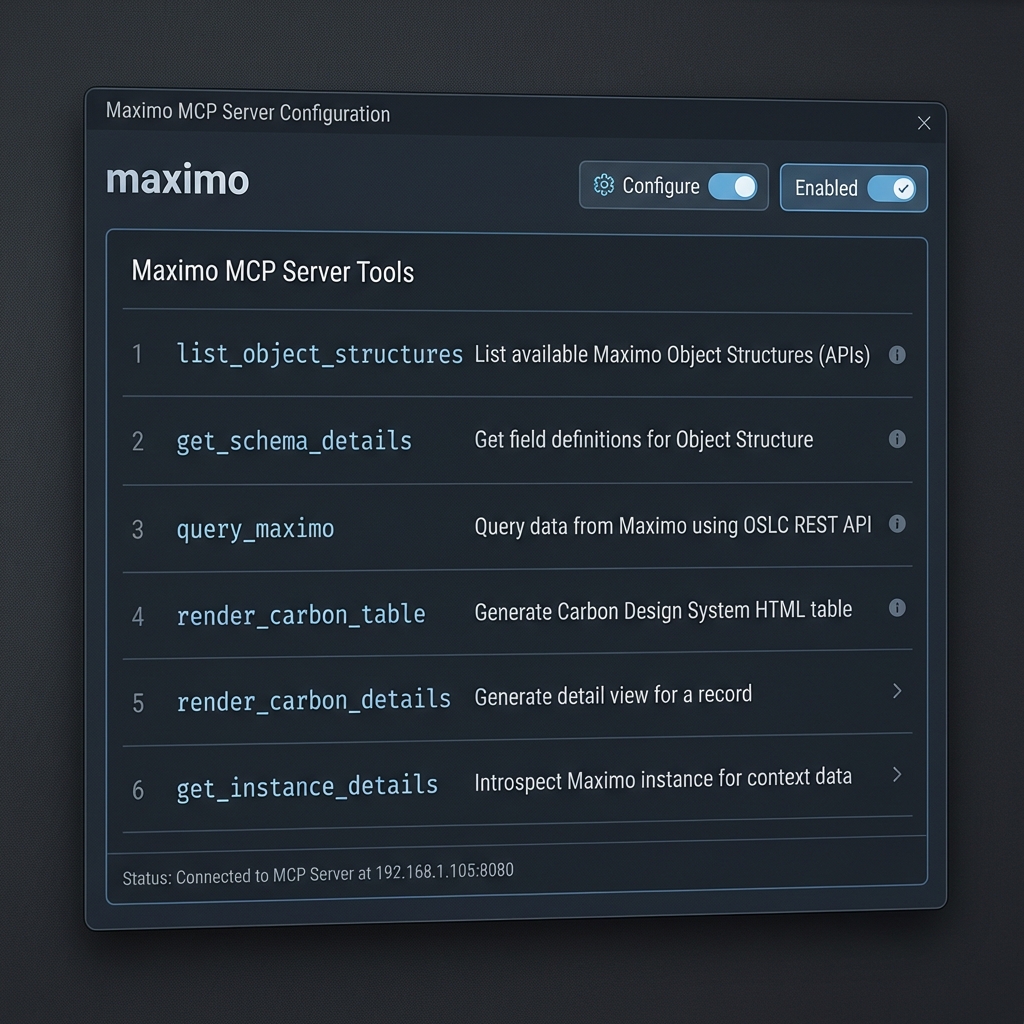
| Tool Name | Description |
|---|---|
list_object_structures | List available Maximo Object Structures (APIs) |
get_schema_details | Get field definitions for an Object Structure |
query_maximo | Execute OSLC REST queries |
render_carbon_table | Generate Carbon Design HTML tables |
render_carbon_details | Generate detail view for a record |
get_instance_details | Check server connectivity |
💡 Use Cases
1. Generate API Calls
"Get me the last 10 approved work orders from BEDFORD site"
The AI calls get_schema_details(MXWO), understands the fields, and generates:
GET /maximo/api/os/mxwo
    ?oslc.where=status="APPR" and siteid="BEDFORD"
    &oslc.select=wonum,description,status,reportdate
    &oslc.orderBy=-reportdate
    &oslc.pageSize=10
    &lean=1
2. Generate Python Scripts
"Write a Python script to export all Priority 1 work orders to CSV"
import requests
import csv

response = requests.get(
    "https://your-host/maximo/api/os/mxwo",
    params={"oslc.where": "wopriority=1", "lean": 1},
    headers={"apikey": "YOUR_KEY"}
)

with open("priority1_workorders.csv", "w") as f:
    writer = csv.DictWriter(f, fieldnames=["wonum", "description"])
    writer.writeheader()
    writer.writerows(response.json()["member"])
3. Generate SQL Queries
"Write SQL to find overdue work orders"
SELECT wonum, description, status, targcompdate
FROM workorder
WHERE status NOT IN ('COMP', 'CLOSE', 'CAN')
  AND targcompdate < CURRENT_DATE;
4. Build Complete Applications
"Create an HTML dashboard to display assets"
Result: A complete web application with:
- Dark theme with glassmorphism
- Search and filter functionality
- Interactive detail panels
- Pre-loaded data from Maximo
See the Asset Manager Case Study for the full walkthrough.
📁 Project Structure
Maximo-MCP/
├── maximo-mcp-server.js       # 🔌 MCP Server implementation
├── server.js                  # 🌐 Local proxy server for CORS
├── package.json               # 📦 Dependencies
├── README.md                  # This file
├── .env.example               # Environment template
├── .gitignore                 # Git ignore rules
│
├── docs/                      # 📚 Documentation
│   ├── Maximo_MCP_Server_Guide.md         # Complete MCP guide
│   ├── Maximo_API_Interaction_Guide.md    # API interaction patterns
│   ├── Asset_Manager_App_Case_Study.md    # Build walkthrough
│   ├── Maximo_MCP_Server_Guide_FR.md      # French translation
│   └── Maximo_API_Interaction_Guide_FR.md # French translation
│
├── demos/                     # 🎨 Demo Applications
│   ├── assets.html                        # Asset Manager app
│   ├── carbon_workorders.html             # Carbon table demo
│   └── index.html                         # API visualization demo
│
├── images/                    # 📸 Screenshots & Recordings
│   ├── assets_demo_recording.webp         # Full demo recording
│   ├── assets_loaded.png                  # Dashboard screenshot
│   ├── pump_search_results.png            # Search demo
│   └── laredo_filtered.png                # Filter demo
│
└── config/                    # ⚙️ Configuration Templates
    └── mcp_config.json.example            # MCP config template
🔒 Security Best Practices
| Practice | Description |
|---|---|
| 🔐 Local Execution | MCP server runs on your machine; API keys never leave your environment |
| 📖 Read-Only Keys | Use limited-permission API keys for development |
| 🔒 Environment Variables | Never hardcode credentials in config files |
| 🌐 HTTPS Only | Always use encrypted connections to Maximo |
🤝 Contributing
Contributions are welcome! Please read our contributing guidelines before submitting PRs.
- Fork the repository
- Create a feature branch (
git checkout -b feature/amazing-feature) - Commit your changes (
git commit -m 'Add amazing feature') - Push to the branch (
git push origin feature/amazing-feature) - Open a Pull Request
📄 License
This project is licensed under the MIT License - see the LICENSE file for details.
🙏 Acknowledgments
- Model Context Protocol for the MCP specification
- IBM Maximo for the enterprise asset management platform
- Carbon Design System for the UI components