Maestro
Produce complete AI videos from a brief with Maestro
One address for any MCP client. You sign in at maestro.mcp.acedata.cloud once, after adding it.
What it does
- Reads
- Writes
- High impact
At most: creates or changes data: records, files, settings.
What it costs
FreeOdel charges nothing per call. The publisher may charge for its own service.
What it asks for at sign-in
| Access to | Read | Change |
|---|---|---|
| Mcp | Not stated: mcp:access | |
From the sign-in at maestro.mcp.acedata.cloud, as the endpoint publishes it. You approve it there.
Tools
None listed · checked 12 Oct 2026Odel could not list its tools without signing in.
Maestro MCP Server
Produce complete videos from a natural-language brief with Maestro through the Ace Data Cloud API. Maestro plans the script, creates or sources media, generates voiceover and music, edits, captions, renders, and returns one finished video in the selected language.
Connect: hosted OAuth, API token, or local stdio
The hosted endpoint is https://maestro.mcp.acedata.cloud/mcp. Choose one route for the MCP client:
| Route | When to use it | Credential setup |
|---|---|---|
| Hosted OAuth | The client supports remote MCP OAuth | Add only the URL, then sign in to AceDataCloud and approve access. No token needs to be pasted into client configuration. |
| Hosted API token | The client cannot finish OAuth, or you need an explicit integration credential | Send an AceDataCloud API token in the Authorization: Bearer … header. Keep it in a local secret store or environment variable. |
| Local stdio | The client runs a local MCP process | Install mcp-maestro and pass ACEDATACLOUD_API_TOKEN to that process. It still calls the AceDataCloud API. |
The hosted service advertises OAuth metadata and Dynamic Client Registration (DCR). DCR registers the client application; it is not an API key. OAuth signs you in and the client sends the resulting Bearer token; it may reuse or create an API credential for the account. Browser sign-in still requires an AceDataCloud account. The hosted service can be metered: review current service documentation and displayed pricing before a real operation. Do not configure both an OAuth login and a fixed Authorization header for the same server.
Hosted OAuth examples
- Claude and Claude Desktop chat: Add a remote custom connector in
Customize → Connectors → Add custom connector, enterhttps://maestro.mcp.acedata.cloud/mcp, select sign-in, and choose Register automatically if Claude asks how to register its OAuth client. Complete consent. Claude Desktop's localclaude_desktop_config.jsonis a separate setup. Claude connector guide. - Claude Code:
claude mcp add --transport http --scope user maestro https://maestro.mcp.acedata.cloud/mcp, thenclaude mcp login maestro. Check/mcp. Claude Code MCP guide. - Cursor: Add a remote server with only
https://maestro.mcp.acedata.cloud/mcp. For a project, merge the entry below into<project>/.cursor/mcp.json; for personal use, use~/.cursor/mcp.json. Cursor MCP guide. - VS Code / Copilot: Run MCP: Add Server, select HTTP, enter
https://maestro.mcp.acedata.cloud/mcp, then finish the browser sign-in. New portable workspace configs use<project>/.mcp.json; the VS Code-specific format below uses<project>/.vscode/mcp.jsonor the user profile. Check MCP: List Servers. VS Code MCP setup. - Codex:
codex mcp add maestro --url https://maestro.mcp.acedata.cloud/mcp, thencodex mcp login maestro. Its user settings are in~/.codex/config.toml. Official Codex MCP guide.
Cursor project config (OAuth):
{
  "mcpServers": {
    "maestro": {"url": "https://maestro.mcp.acedata.cloud/mcp"}
  }
}
VS Code-specific workspace config (OAuth):
{
  "servers": {
    "maestro": {"type": "http", "url": "https://maestro.mcp.acedata.cloud/mcp"}
  }
}
Hosted API token
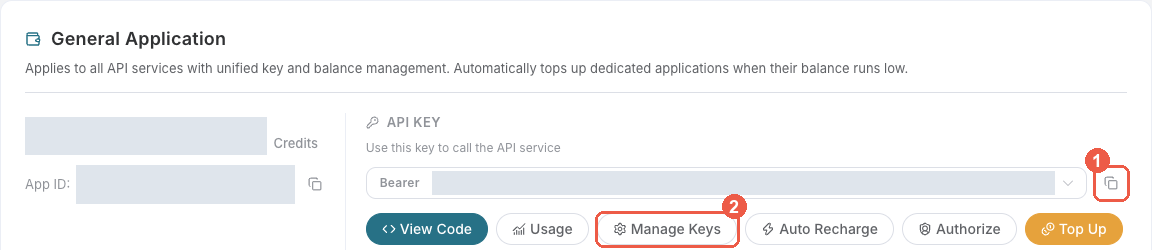
- Open Ace Data Cloud → Applications. Sign in, or register an account first.
- Find General application. If it has not been created, choose Initialize General Application. A general key can use the services available to your account; a dedicated application's key is limited to its service. Check the required service/model access and current pricing.
- Copy the API Key from the application card, or open Keys / Manage Keys → Create to create a separate key for this integration. Give it a recognizable name so you can revoke or rotate it independently.
- When creating a key, review Expiration Time, Set Usage Limitation, and Allowed APIs. Enable only the restrictions you need, allow the operations you will call, then click Create and copy the token from the key list. Task lookup does not grant permission to submit a generation. Confirm the application's balance can cover your first request; any trial allowance is whatever your account currently displays.
- Copy only the token value, without quotation marks, spaces, or
Bearer. An API Key / API Token field expects this raw value; only a manually configured HTTPAuthorizationheader needs theBearerprefix. Aplatform-...account-management token cannot replace a generation API key.
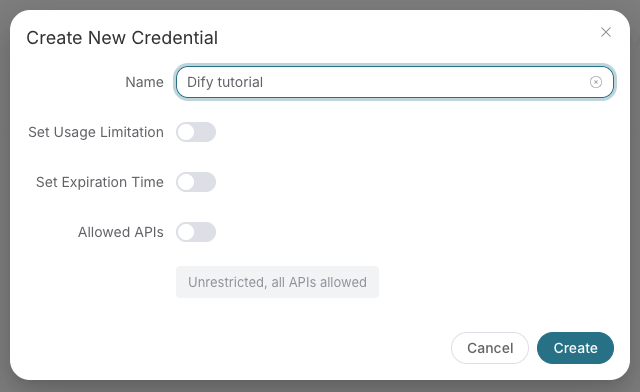
Save the key in the client's credential store or the environment variable shown below. Never put it in a prompt, shared workflow, screenshot, or Git commit. If authentication fails, check the full copied value, application/service access, expiration, usage limit, and balance before creating another key.
A fixed Bearer header bypasses OAuth. If the header is invalid, remove it before trying browser sign-in; keep the saved credential private.
For Claude Code, the shell expands the token when you add the server; treat the saved user MCP config as a secret:
export ACEDATACLOUD_API_TOKEN='YOUR_API_TOKEN'
claude mcp add --transport http --scope user maestro https://maestro.mcp.acedata.cloud/mcp \
  --header "Authorization: Bearer $ACEDATACLOUD_API_TOKEN"
For a Claude Code project config, put a variable reference in <project>/.mcp.json and set that variable in the environment that launches Claude Code:
{
  "mcpServers": {
    "maestro": {
      "type": "http",
      "url": "https://maestro.mcp.acedata.cloud/mcp",
      "headers": {"Authorization": "Bearer ${ACEDATACLOUD_API_TOKEN}"}
    }
  }
}
Cursor uses a different environment-variable syntax in ~/.cursor/mcp.json or an uncommitted project config:
{
  "mcpServers": {
    "maestro": {
      "url": "https://maestro.mcp.acedata.cloud/mcp",
      "headers": {"Authorization": "Bearer ${env:ACEDATACLOUD_API_TOKEN}"}
    }
  }
}
In VS Code, run MCP: Open User Configuration and merge this server plus its masked input; ${input:...} is for VS Code's user/workspace format and is not portable to the Agent Host .mcp.json format:
{
  "inputs": [
    {"id": "acedata-maestro-token", "type": "promptString", "description": "AceDataCloud API token", "password": true}
  ],
  "servers": {
    "maestro": {
      "type": "http",
      "url": "https://maestro.mcp.acedata.cloud/mcp",
      "headers": {"Authorization": "Bearer ${input:acedata-maestro-token}"}
    }
  }
}
For Cline, use its MCP configuration UI or CLI file ~/.cline/data/settings/cline_mcp_settings.json; its remote transport value is streamableHttp. For JetBrains AI Assistant, add a remote URL from Settings → Tools → AI Assistant → Model Context Protocol (MCP). For Zed, use a context_servers entry with the URL only for OAuth or add a local Bearer header. These clients have different configuration schemas; follow their current UI rather than copying another client's JSON. Cline · JetBrains · Zed.
Local stdio
Install the package and give the local process an API token:
python -m pip install mcp-maestro
export ACEDATACLOUD_API_TOKEN='YOUR_API_TOKEN'
mcp-maestro
For Claude Desktop local MCP, merge this entry into the file opened by its developer settings (~/Library/Application Support/Claude/claude_desktop_config.json on macOS). uvx requires uv on PATH:
{
  "mcpServers": {
    "maestro": {
      "command": "uvx",
      "args": ["mcp-maestro"],
      "env": {"ACEDATACLOUD_API_TOKEN": "YOUR_API_TOKEN"}
    }
  }
}
Keep this user-level file private. Self-hosted HTTP uses mcp-maestro --transport http --port 8000; expose it only with suitable network and TLS controls. Local execution still calls the AceDataCloud API.
Check before using the service
https://maestro.mcp.acedata.cloud/healthreturning{"status":"ok"}checks endpoint reachability only.- Confirm that the MCP client loads tools. The tool list shows MCP discovery, not downstream API access or balance.
- If you need a full API check, call
maestro_create_videowith your own valid input after reviewing current service documentation and displayed pricing. If the result contains a task ID, callmaestro_get_taskon that same ID until terminal success or failure. Do not resubmit the operation just to check progress.
For 401, check which auth route the client used and whether the token or OAuth session is valid. A 403 may mean an account permission or content moderation failure; read the returned error. Insufficient balance and downstream service failures need their own diagnosis. A listed tool or submitted task does not prove a successful result.
Tools
| Tool | Purpose |
|---|---|
maestro_create_video | Create a video or run remix, edit, or extend on an earlier task |
maestro_get_task | Read progress, status, and the final video for one task |
maestro_list_tasks | List the authenticated account's recent tasks, newest first |
Example
Ask an MCP client:
Create a 45-second 16:9 English product launch video from this product photo. Use an editorial style and a documentary voice.
The tool returns a task_id immediately. Query that ID until status is succeeded or failed. Successful tasks expose one video in response.data.variants.
To inspect existing task history without creating a video, call maestro_list_tasks. It accepts a limit from 1 to 100 and optional exclusive created_at_min / created_at_max Unix timestamp bounds. The returned items honor those filters; count remains the authenticated account's total visible task count.
Production contract
Maestro provides the complete capability set on every request: all actions and scenarios, 5–300 seconds, one language per task, and 1080p/30fps output. Successful jobs cost 0.7 Credits per actual delivered second, with no scenario or language surcharge; check the current Maestro pricing before submitting. Billing never exceeds the requested duration; failed jobs and task polling are free. Task polling does not submit a new generation.
To revise an existing result, call maestro_create_video with an iteration action and the prior task ID:
{
  "prompt": "Keep the visuals but tighten the first 10 seconds and use a warmer voice.",
  "action": "edit",
  "ref_task_id": "previous-task-id"
}
MCP Client Configuration
{
  "mcpServers": {
    "maestro": {
      "command": "uvx",
      "args": ["mcp-maestro"],
      "env": {
        "ACEDATACLOUD_API_TOKEN": "your-token"
      }
    }
  }
}
Development
pip install -e ".[dev,test,release]"
pytest --cov=core --cov=tools
ruff check .
ruff format --check .
mypy core tools main.py
python -m build
See the Maestro API documentation for billing and response details.